Configure VPN Connection Introduction on Windows Seven
Posted by pakistan It Intl.Posted in Setup VPN Connection
Tags: Set Up VPN Connections, VPN, VPN Service, Windows Seven
Setting up VPN connection access under Windows Seven is simple. The following instructions go step–by–step through the creation process.

Step01. First, click on the Start button and click “Control Panels”. This opens up the “Control Panel Home”.
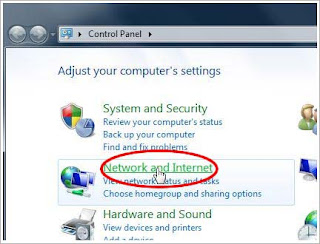
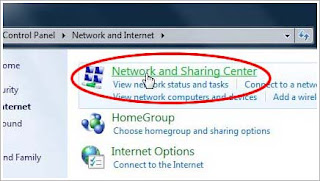
Step02. Next, click on the “Network and Internet” control panel, which is circled in red below.
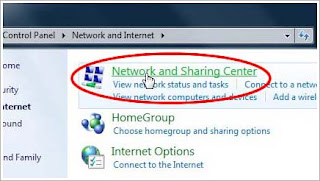
Step03. Next, click on “Connect to a network”.
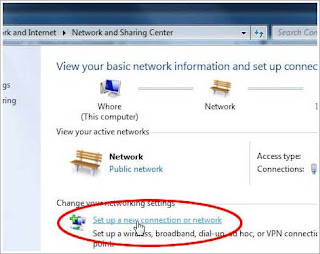
Step04. The next screen may not look quite like this if you have networks already defined. In any case, click on “Set up a connection or Network”.
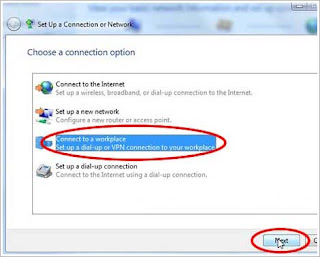
Step05. On the next screen, click on “Connect to a workplace” then click “Next”.
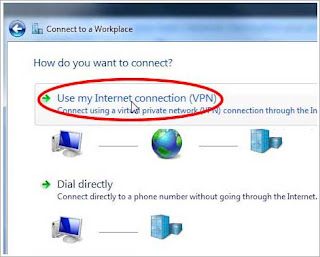
Step06. Next click “Use my Internet connection (VPN)”. If you are asked if you would like to use an existing connection choose 'No, create a new connection' and click 'Next'.
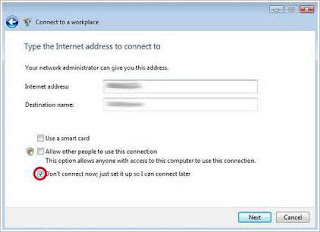
Step07. Now, enter the server information. In the text box labeled ‘Internet address’ type IP address of our VPN server that we provide to you. In the text box labeled ‘Destination name’ type ‘Provide VPN.com’. This is the name of the connection, and will show up in the “Connect to a network” screen when we’re done. Lastly, make sure that the checkbox labeled “Don't connect now; just set it up so I can connect later” is checked. Then click the “Next” button.
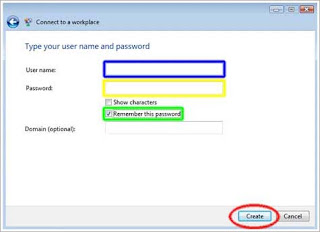
Step08. In this screen, enter your Provide VPN username and password. In the text box labeled “User name:” (highlighted in blue), enter your Provide VPN username. In the text box labeled “Password:” (highlighted in yellow), enter your Provide VPN password. Optionally, check the “Remember this password” checkbox (highlighted in green) and you won’t have to enter your password when you connect to Provide VPN. Then, click the ”Create” button.
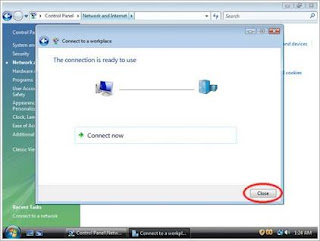
Step09. You should see this screen next. Click the “Close” button to return to the “Network and Internet” screen.
Step10. Now click on “Connect to a network” again.
Posted by pakistan It Intl.Posted in Setup VPN Connection
Tags: Set Up VPN Connections, VPN, VPN Service, Windows Seven
Setting up VPN connection access under Windows Seven is simple. The following instructions go step–by–step through the creation process.

Step01. First, click on the Start button and click “Control Panels”. This opens up the “Control Panel Home”.

Step02. Next, click on the “Network and Internet” control panel, which is circled in red below.

Step03. Next, click on “Connect to a network”.

Step04. The next screen may not look quite like this if you have networks already defined. In any case, click on “Set up a connection or Network”.

Step05. On the next screen, click on “Connect to a workplace” then click “Next”.

Step06. Next click “Use my Internet connection (VPN)”. If you are asked if you would like to use an existing connection choose 'No, create a new connection' and click 'Next'.

Step07. Now, enter the server information. In the text box labeled ‘Internet address’ type IP address of our VPN server that we provide to you. In the text box labeled ‘Destination name’ type ‘Provide VPN.com’. This is the name of the connection, and will show up in the “Connect to a network” screen when we’re done. Lastly, make sure that the checkbox labeled “Don't connect now; just set it up so I can connect later” is checked. Then click the “Next” button.

Step08. In this screen, enter your Provide VPN username and password. In the text box labeled “User name:” (highlighted in blue), enter your Provide VPN username. In the text box labeled “Password:” (highlighted in yellow), enter your Provide VPN password. Optionally, check the “Remember this password” checkbox (highlighted in green) and you won’t have to enter your password when you connect to Provide VPN. Then, click the ”Create” button.

Step09. You should see this screen next. Click the “Close” button to return to the “Network and Internet” screen.

Step10. Now click on “Connect to a network” again.